Dev: PlantUML + VS Code + GitLab
I was looking for a way to share some details of implementation with my colleagues and in the same time to have it as a documentation on which we could collaborate and evolve it. It also should have been visual to have a better understating on composition.
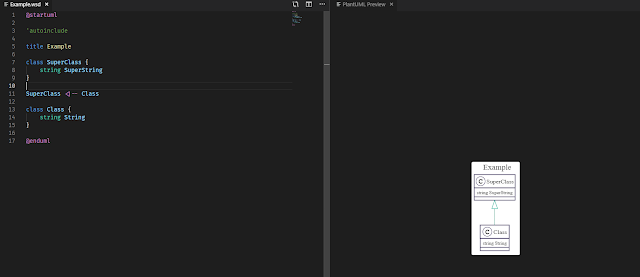
I could of course draw it from scratch using any existing drawing tool, but since I had quite a lot of types to put on, I gave up on the idea of never-ending copy/pasting from code to the diagram. Fortunately, one of my colleagues suggested me to try PlantUML. I gave it a try using an online editor and was surprised by the efficiency and the speed my diagram started to get in shape. It's much more easier to write a text and the syntax is very intuitive, so why bother with drawing and aligning those boxes while you can just leave it on PlantUML? We did a quick additional research and found that there is also a neat VS Code Extension that allows to have a preview on every update.
So the next target was to automate the generation of diagrams using the Gitlab CI. And it was actually very satisfying to achieve it and by the end to have a visual documentation that is updated automatically on every git push.

So the next target was to automate the generation of diagrams using the Gitlab CI. And it was actually very satisfying to achieve it and by the end to have a visual documentation that is updated automatically on every git push.
So here is a step by step description on how to do it:
- Get the VS Code Extension at https://github.com/qjebbs/vscode-plantuml
- We’ve used a Local runner so as the documentaion says you’ll need to install Java and Graphviz on your computer. For Graphviz, you can just download the binaries and create an environment variable GRAPHVIZ_DOT to point to the dot.exe.
GRAPHVIZ_DOT=[path_to_graphviz]\dot.exe - Configure the extension to use the Local runner as follows:
- If you want to apply your own styles you can do it using includes, the extension proposes a nice feature to automatically include an external file
- First you have to configure the includes add this to your project’s settings:
- Add 'autoinclude into your source file, it should work like a charm
- Now since the real power of PlantUML it that it’s a plain text file you may add it into you Git repository to keep the versioning.
- Now let’s see how to integrate it with the Gitlab CI. It’s as simple as add the following to the script section of your .gitlab-ci.yml
- Now you should have your diagrams generated automatically
- Since Gitlab allows you to access your latest build artifacts, it’s easy to have a direct link to the latest generated image of your diagram:
- Profit!
{
     "plantuml.render": "Local",
     "plantuml.java": "[path_to_java]\\java.exe"
}

Note: in my case I had issues with directories with spaces in their name,
so I had to put the java.exe somewhere else
{
    "plantuml.includes": ["includes"]
}

Note: it only works if the directory with includes has a name “includes”
@"%SystemRoot%\System32\WindowsPowerShell\v1.0\powershell.exe" -NoProfile -InputFormat None -ExecutionPolicy Bypass -Command "iex ((New-Object System.Net.WebClient).DownloadString('https://chocolatey.org/install.ps1'))" && SET "PATH=%PATH%;%ALLUSERSPROFILE%\chocolatey\bin"
choco feature enable -n allowGlobalConfirmation
choco install plantuml --params "/NoShortcuts"
plantumlc -o "[working_directory]\out" -I[working_directory]\includes\[inculde_file].wsd -v -r src\**\*.wsd
https://[gitlab_url]/[your_project]/-/jobs/artifacts/master/raw/out/[your_diagram].png?job=build

